Merhaba arkadaşlar, bu yazımda .net core mvc ile yaptığınız sitelerde google ile nasıl login olacağınızı anlatmaya çalışacağım. Öncelikle https://console.cloud.google.com/ adresine girip yeni bir proje oluşturuyorsunuz. Ben bu makale için yeni bir gmail hesabı kullandım, daha önce uygulama kurduğunuz bir hesabınız olursa orada diğer projelerinizi görebilirsiniz.
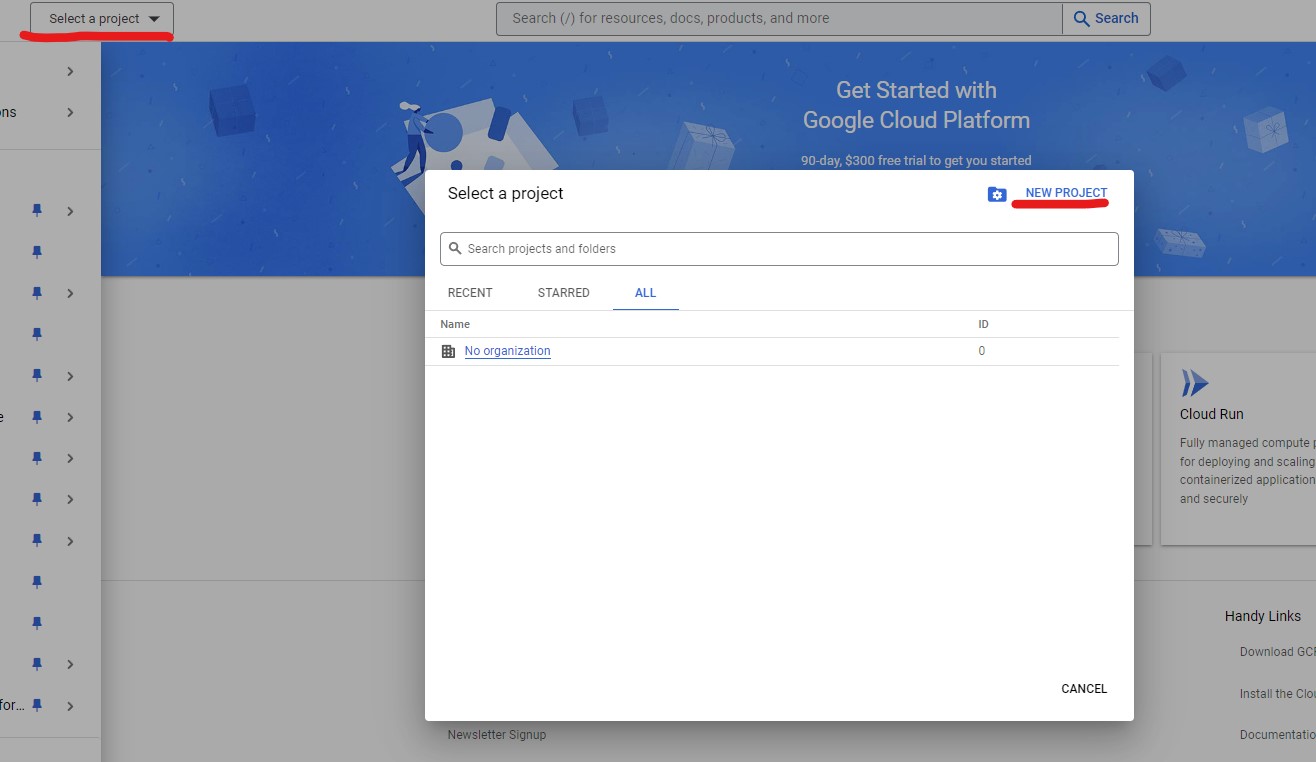
Sonra proje oluşturma sayfasına yönlendirileceksiniz.
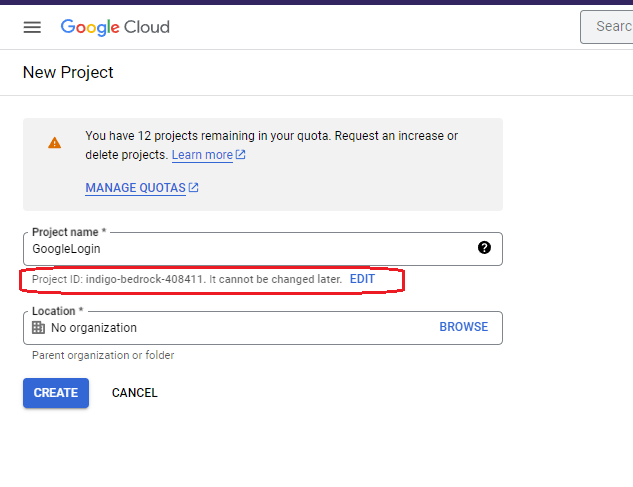
Burada kırmızı alanla işaretlediğim alan projenizin ID'si kullanıcıların uygulama izin ekranlarında göreceği uygulama ismi. Bunu edit yaparak tekil bir isim verebilirsiniz veya varsayılan olarak bırakabilirsiniz. Ben loginmakalesi yaptım.

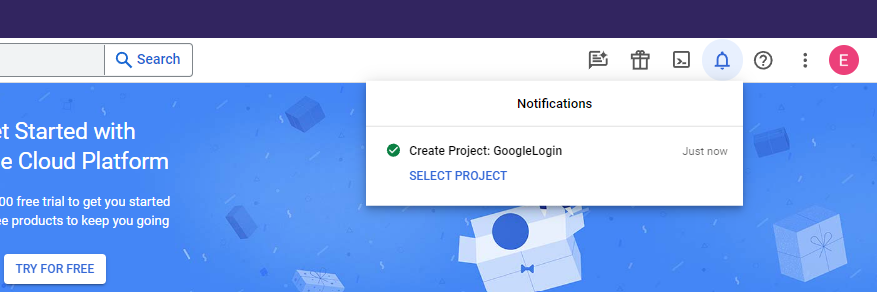
Id alanı benzersiz olmalıdır, mail adresinizi alırkenki kurallar buraası içinde geçerlidir. Bu adımları yaptıktan sonra Create diyoruz ve gelen bildirim ile projemizi seçiyoruz.
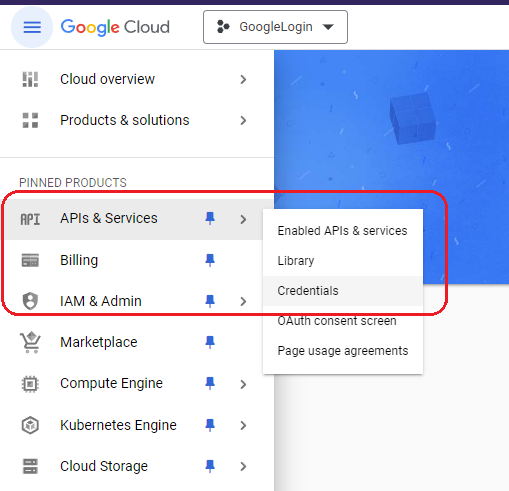
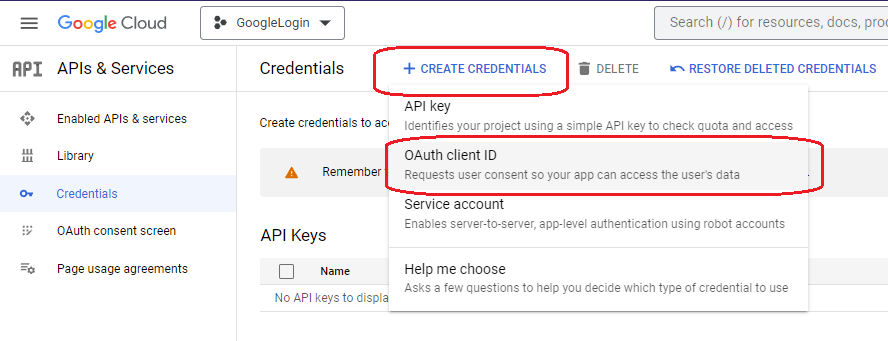
Projemizi seçtikten sonra sol menüden: APIs & Services > Credentials sayfasına gidiyoruz.
Açılan sayfada CREATE CREDENTIALS > OAuth client ID seçeneğine tılklıyoruz.
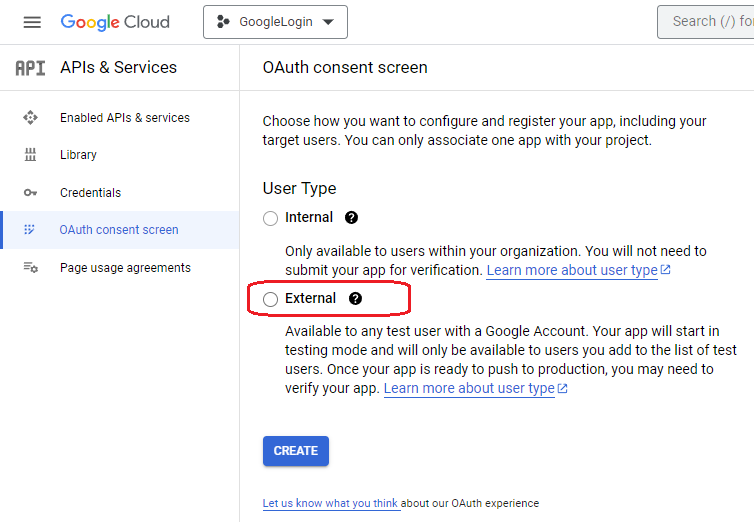
Sonra gelen sayfada Configure consent screen butonuna tıklıyoruz. OAuth consent screen sayfasına geldiğimiz de External seçeneğini seçiyoruz ve Create diyoruz.
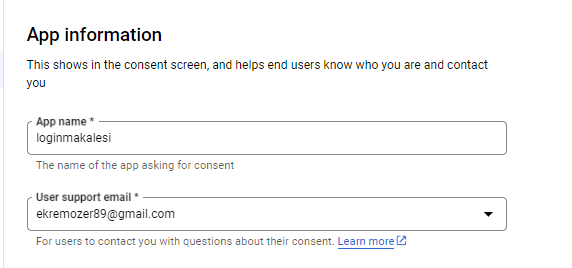
Şimdi Edit app registration sayfamıza geldik ve uygulama ile ilgil ayarları yapacağımız sayfa burası. Sırasıyla bu sayfayı anlatmaya çalışayım.
App information sayfası, bu kısma kullanıcı onay ekranında gözükecek uygulama ismi, ve iletişim e-mailini giriyoruz App name kısmına yukarıda veridiğimiz Project ID yi yazmalıyız yoksa kabul etmiyor.
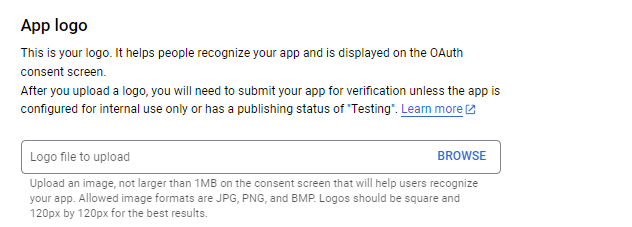
App Logo, bu kısma uygulamamızın veya sitemizin logosunu 120px X 120px boyutunda ve jpg, png veya bmp formatında ekliyoruz ancak zorunlu olmadığı için ben yapmıyorum şuan.
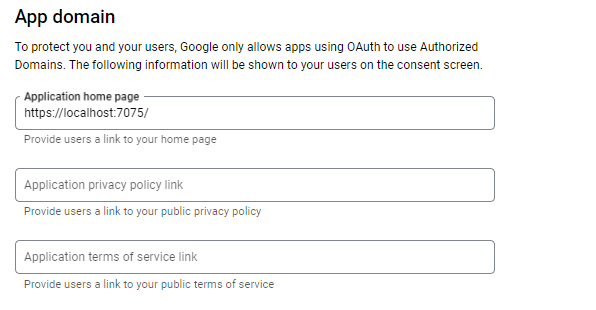
App domain, bu kısma websitemizin URL'ini giriyoruz. Home page kısmına localhost url'imi yazdım, privacy policy ve terms of service zorunlu olmadığı için ben girmiyorum.
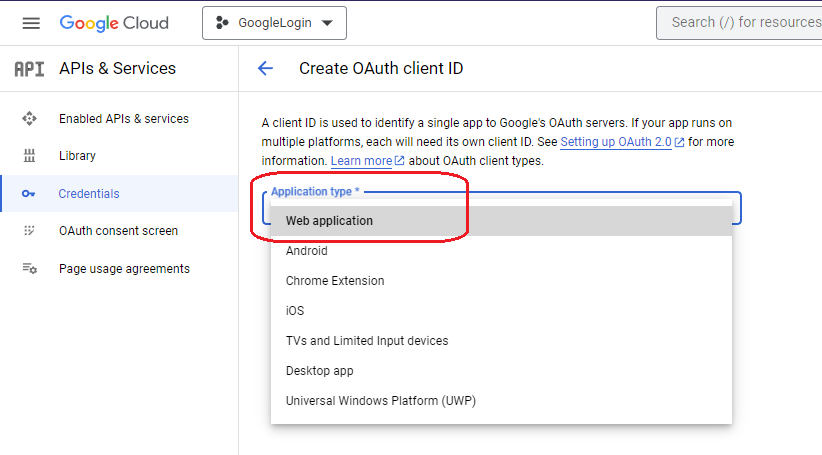
Authorized domains kısmı bizim makalemiz için gerekli değil, o kısmı boş geçiyoruz, Developer contact information kısmına ise geliştirici mailini yazıyoruz, ben yukarıda seçtiğim mail adresini yazdım ve Save And Continue diyoruz. Bu işlemden sonra karşımıza iki adım daha çıkacak onlarada Save And Continue diyerek devam ediyoruz ve tekrar CREATE CREDENTIALS > OAuth client ID seçeneğine tıklıyoruz,
Bu sefer seçeneklerde Application type çıkıyor ve oradan Web application'u seçiyoruz.
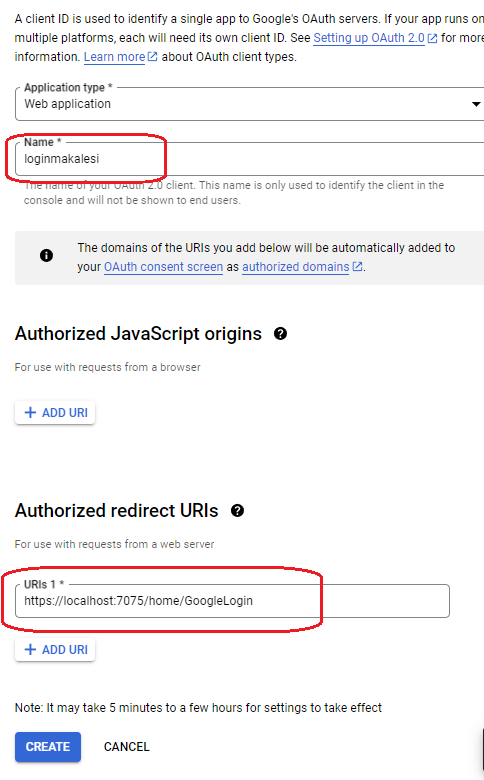
Seçimi yaptıktan sonra aşağıdaki açılan panelde Name kısmına proje id'mizi ve Authorized redirect URIs kısmına da onay ekranından sonra yönlendirilecek Url'i yazıyoruz, ben yine localdeki urlimi yazdım. Ve Create diyoruz.
Create işlemi sorunsuz bittiği zaman bize uygulama erişimi ve entegrasyonu için gerekli keyleri veren bir popup çıkıyor karşımıza.
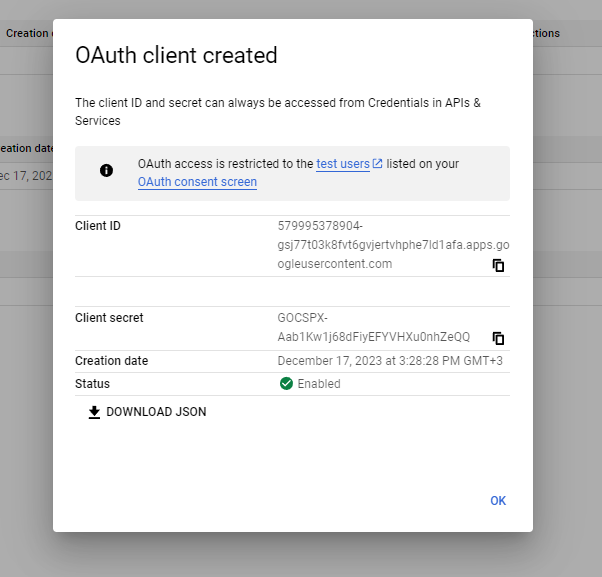
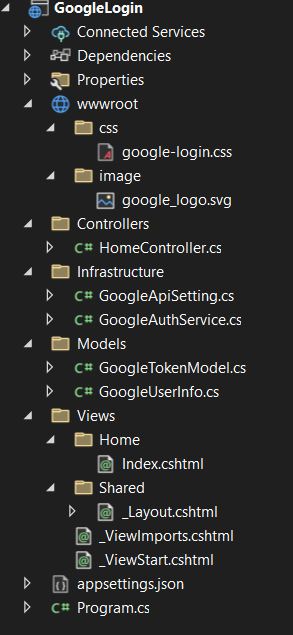
Client ID, Client secret ve Redirect Url bilgilerini not edip uygulamamıza dönüyoruz, google tarafında yapacaklarımız bu kadardı. Şimdi .net core mvc projesi kısmına geçelim, benim projemim dizinleri ve dosyaları bu şekilde;
Öncelikle projemizde kullanacağımız iki model var GoogleTokenModel ve GoogleUserInfo bu iki class'ı projemize ekleyelim
GoogleTokenModel
public class GoogleTokenModel
{
    [JsonProperty("access_token")]
    public string AccessToken { get; set; }
    [JsonProperty("expires_in")]
    public int ExpiresIn { get; set; }
    [JsonProperty("refresh_token")]
    public string RefreshToken { get; set; }
    [JsonProperty("scope")]
    public string Scope { get; set; }
    [JsonProperty("token_type")]
    public string TokenType { get; set; }
}
GoogleUserInfo
public class GoogleUserInfo
{
    [JsonProperty("id")]
    public string Id { get; set; }
    [JsonProperty("email")]
    public string Email { get; set; }
    [JsonProperty("verified_email")]
    public bool VerifiedEmail { get; set; }
    [JsonProperty("name")]
    public string Name { get; set; }
    [JsonProperty("given_name")]
    public string GivenName { get; set; }
    [JsonProperty("family_name")]
    public string FamilyName { get; set; }
    [JsonProperty("picture")]
    public string Picture { get; set; }
    [JsonProperty("locale")]
    public string Locale { get; set; }
}
JsonProperty'ler json verideki hangi alanı hangi propertye set edeceğimizi belirtmek için kullanılır. Şimdi GoogleApiSetting classımızı ekleyelim.
public static class GoogleApiSetting
{
    public static string AuthUrl { get; set; } = "https://accounts.google.com/o/oauth2/v2/auth/oauthchooseaccount?redirect_uri={RedirectUrl}&prompt={Prompt}&response_type={ResponseType}&client_id={ClientId}&scope={Scope}&access_type={AccessType}&service={Service}&o2v={O2V}&flowName={FlowName}";
    public static string Prompt { get; set; } = "consent";
    public static string ResponseType { get; set; } = "code";
    public static string Scope { get; set; } = "https://www.googleapis.com/auth/userinfo.email https://www.googleapis.com/auth/userinfo.profile";
    public static string AccessType { get; set; } = "offline";
    public static string Service { get; set; } = "lso";
    public static string O2V { get; set; } = "2";
    public static string FlowName { get; set; } = "GeneralOAuthFlow";
    public static string GrandType { get; set; } = "authorization_code";
    public static string GetTokenPostUrl { get; set; } = "https://oauth2.googleapis.com/token";
    public static string GetUserInfoPostUrl { get; set; } = "https://www.googleapis.com/oauth2/v1/userinfo";
    //Dinamik alanlar
    public static string RedirectUrl { get; set; } = "https://localhost:7075/home/GoogleLogin";
    public static string ClientId { get; set; } = "579995378904-gsj77t03k8fvt6gvjertvhphe7ld1afa.apps.googleusercontent.com";
    public static string ClientSecret { get; set; } = "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";
}
Bu classı test projesini amacı dışında geliştirmemek için statik yaptım, Dinamik alanlar diye ayırdığım kısım sizin projenize özel olacak, diğer alanlar her projede aynı. Ben canlı projemde settings tablosunda tutup cache'den okuyorum bu alanları. Sizde kendinize göre düzenleyebilirsiniz. Not almanızı istediğim Client ID, Client secret ve Redirect Url bilgilerinizi bu class'a ekleyin.
GoogleAuthService class'ımız;
public class GoogleAuthService
{
    private readonly IHttpClientFactory _httpClientFactory;

    public GoogleAuthService(IHttpClientFactory httpClientFactory)
    {
        _httpClientFactory = httpClientFactory;
    }

    public async Task<string> GetRedirectUrl()
    {
        var redirectUrl = GoogleApiSetting.AuthUrl
            .Replace("{RedirectUrl}", GoogleApiSetting.RedirectUrl)
            .Replace("{Prompt}", GoogleApiSetting.Prompt)
            .Replace("{ResponseType}", GoogleApiSetting.ResponseType)
            .Replace("{ClientId}", GoogleApiSetting.ClientId)
            .Replace("{Scope}", GoogleApiSetting.Scope)
            .Replace("{AccessType}", GoogleApiSetting.AccessType)
            .Replace("{Service}", GoogleApiSetting.Service)
            .Replace("{O2V}", GoogleApiSetting.O2V)
            .Replace("{FlowName}", GoogleApiSetting.FlowName);

        return await Task.FromResult(redirectUrl);
    }

    public async Task<GoogleTokenModel> GetTokenModel(string code)
    {
        var tokenPostModel = new
        {
            code,
            redirect_uri = GoogleApiSetting.RedirectUrl,
            client_id = GoogleApiSetting.ClientId,
            client_secret = GoogleApiSetting.ClientSecret,
            scope = GoogleApiSetting.Scope,
            grant_type = GoogleApiSetting.GrandType,
            access_type = GoogleApiSetting.AccessType,
        };
        var tokenPostJson = JsonConvert.SerializeObject(tokenPostModel);

        var httpClient = _httpClientFactory.CreateClient();
        var stringContent = new StringContent(tokenPostJson, Encoding.UTF8, "application/json");
        var tokenResponseMessage = await httpClient.PostAsync(GoogleApiSetting.GetTokenPostUrl, stringContent);

        var tokenResponseContent = await tokenResponseMessage.Content.ReadAsStringAsync();
        if (tokenResponseMessage.StatusCode != HttpStatusCode.OK) return null;

        var tokenModel = JsonConvert.DeserializeObject<GoogleTokenModel>(tokenResponseContent);
        return tokenModel;
    }

    public async Task<GoogleUserInfo> GetUserInfo(string accessToken)
    {
        var httpClient = _httpClientFactory.CreateClient();
        httpClient.DefaultRequestHeaders.Authorization = new AuthenticationHeaderValue("Bearer", accessToken);
        var userInfoResponseMessage = await httpClient.GetAsync(GoogleApiSetting.GetUserInfoPostUrl);

        var userInfoResponseContent = await userInfoResponseMessage.Content.ReadAsStringAsync();
        if (userInfoResponseMessage.StatusCode != HttpStatusCode.OK) return null;

        var userInfo = JsonConvert.DeserializeObject<GoogleUserInfo>(userInfoResponseContent);
        return userInfo;
    }
}
Şimdi bu classın metodlarını sırasıyla izah edeyim;
GetRedirectUrl: Bu metod GoogleApiSetting classımızdaki alanlarla uygulamamıza redirect edecek url'i oluşturuyor.
GetTokenModel: Bu metod google'dan aldığımız code ile kullanıcı bilgilerine erişeceğimiz token'ı dönen metod.
GetUserInfo: Bu metod oluşturduğumuz token ile login ve kayıt işleminde kullanacağımız kullanıcı bilgilerini dönen metod.
Bu classımızda IHttpClientFactory kullandığımız için program.cs'e AddHttpClient'i servis olarak ekliyoruz ayrıca bu class'ı da consructor olarak kullacağımız için AddSingleton olarak ekliyoruz.
 builder.Services.AddHttpClient();
 builder.Services.AddSingleton<GoogleAuthService>();
Tüm işlemleri HomeController üzerinden yapacağım, siz kendi projenize göre evirirsiniz. HomeController'ın kodları aşağıdaki gibi;
public class HomeController : Controller
{
    private readonly GoogleAuthService _googleAuthService;

    public HomeController(GoogleAuthService googleAuthService)
    {
        _googleAuthService = googleAuthService;
    }

    public IActionResult Index()
    {
        return View();
    }

    public async Task<IActionResult> GoogleLoginRedirect()
    {
        var redirectUrl = await _googleAuthService.GetRedirectUrl();
        return Redirect(redirectUrl);
    }

    public async Task<IActionResult> GoogleLogin(string code)
    {
        var tokenModel = await _googleAuthService.GetTokenModel(code);
        if (tokenModel == null)
        {
            //TODO:Token alınamadı, hata yönetimi
        }
        else
        {
            var userInfo = await _googleAuthService.GetUserInfo(tokenModel.AccessToken);
            if (userInfo == null)
            {
                //TODO:Kullanıcı bilgisi alınamadı, hata yönetimi
            }
            else
            {
                ViewBag.UserInfo = userInfo;
                //TODO:Kullanıcı kayıt ve giriş işlemleri...
            }
        }

        return View("Index");
    }
}
Sırasıyla actionları izah edeyim;
Index: Bu actionda login butonu ve loginden sonra gösterilecek kullanıcı bilgileri olacak sadece.
GoogleLoginRedirect: Bu action google ile giriş yap butonuna tıklandığında bizi google sayfasına yönlendirecek.
GoogleLogin: Bu action, kullanıcı onay verdikten sonra google'ın bizi yönlendireceği action. Bu kısmı biraz detaylandırayım. Kullanıcı izin verdikten sonra google bizim return url adresine döner ancak oluşturduğu kodu ?code=xxx olarak belirlediğimiz url'in sonuna ekler. Bizde bu code ile GetTokenModel token oluştururuz. Sonra bu metoddan dönen model ile GetUserInfo metoduna gider kullanıcı bilgilerini alırız. Ben öngördüğüm ölçüde olası hatalan için if bloklarını koydum siz de geliştirme sürecince karşılaştığınız veya ihtimal verdiğiniz hatalar için kodu revize edebilirsiniz..
Son olarak projeme Index.cshtml ekliyorum.
@{
    ViewData["Title"] = "Ana Sayfa";
    var userInfo = ViewBag.UserInfo as GoogleUserInfo;
}

@if (userInfo == null)
{
    <div class="google-btn" onclick="location.href='/home/GoogleLoginRedirect'">
		<div class="google-icon-wrapper">
            <img class="google-icon" src="~/image/google_logo.svg" alt="Google İle Giriş Yap" />
        </div>
        <p class="btn-text">Google İle Giriş Yap</p>
    </div>
}
else
{
    <table>
        <tr>
            <td>Id</td>
            <td>@userInfo.Id</td>
        </tr>
        <tr>
            <td>Email</td>
            <td>@userInfo.Email</td>
        </tr>
        <tr>
            <td>Email Doğrulama</td>
            <td>@userInfo.VerifiedEmail</td>
        </tr>
        <tr>
            <td>Tam Adı</td>
            <td>@userInfo.Name</td>
        </tr>
        <tr>
            <td>Adı</td>
            <td>@userInfo.GivenName</td>
        </tr>
        <tr>
            <td>Soyadı</td>
            <td>@userInfo.FamilyName</td>
        </tr>
        <tr>
            <td>Profil Resmi</td>
            <td><img src="@userInfo.Picture" alt="picture"></td>
        </tr>
        <tr>
            <td>Dil</td>
            <td>@userInfo.Locale</td>
        </tr>
    </table>
}
<style>
    table, tr, td {
        border: solid 1px
    }
</style>
Google İle Giriş Yap butonunu eklemek için google js kütüphanesi kullanmamı söylüyordu ancak codepen sitesinden html ve css ile yapan bir arkadaşın kodlarını kullandım ve java script onclick eventi ile action'uma yönlendirdim, size kullanışsız geldiyse başka bir yöntem deneyebilirsiniz.
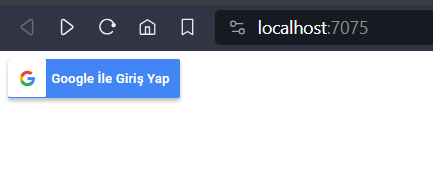
Bir şeyi atlamadığımı düşünüyorum, şimdi projemi çalıştırıyorum ve ana sayfada sadece Google İle Giriş Yap butonu var;
Butona tıkladığım zaman beni onay ekranına yönlendiriyor ve hangi hesapla işlem yapmamı istediğimi soruyor, bende tek oturum olduğu için tek bir hesap çıktı.
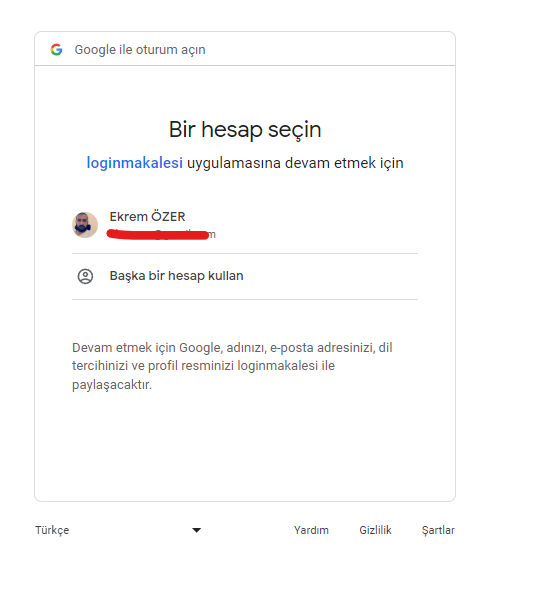
Giriş yapmak istediğim hesabımın üstüne tıklıyorum ve code ile benim belirlediğim return url'e dönüyor,
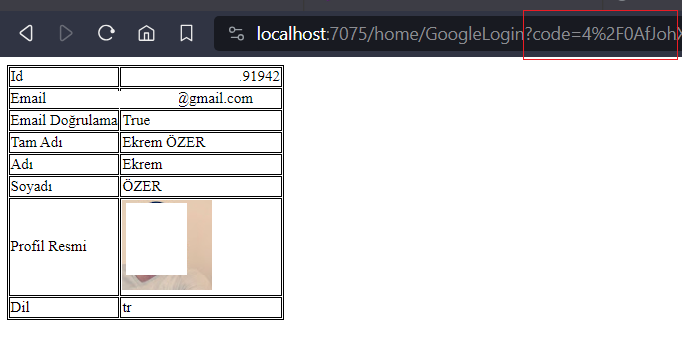
Gördüğünüz gibi url'ime code parametresi eklendi ve bu code ile oluşturduğum token ile kullanıcı bilgilerini alabildim. Benim bu makalede anlatacaklarım bu kadar, internetteki mevcut kaynaklarla yapamadığım ve bir kısmını deneme/yanılma yöntemi ile çözdüğüm için eksik veya hatalı anlattığım kısımlar olabilir, umarım işinize yarar.
Projenin kaynak kodları: https://github.com/ekremozer/GoogleLogin